So Tuesday night, the back of my mouth where the naval cavity meets the throat began to feel itchy. I could tell I was coming down with something.
My roommate diagnosed it as a sinus infection and prescribed, among other things, some super spicy Korean barbecue. If you’ve ever gone to Cup-Bop in Provo and ordered a ten, you know what I’m talking about. That stuff will melt your face off—or, in my case, rapidly evacuate the sinuses, denying that territory to the infection.
The next two days were pretty miserable. I got maybe an hour of sleep the first night, and woke up with a nasty sore throat, as well as a headache and stuffy nose. Had more Korean barbecue the next day, which did help with the sinuses but also ripped out my stomach lining and did a number on my digestive tract. That stuff is insane.
The worst is over, though, and I was back on my feet this morning. Which is remarkable, because this time last year, I had the same virus, and it knocked me out for a month. Literally. I was bedridden for three or four days, and confined to my apartment for another three weeks. Compared to that, two days of a nuked digestive tract combined with moderate flu symptoms isn’t so bad.
The moral of the story is that sometimes, the best way to fight a disease is to wage a scorched earth campaign on your own body. Also, do not underestimate the power of Korean barbecue.
I’ll be back next week. Hopefully my stomach lining will be back too.
The difference between having the right tool for the job and the wrong tool is often the difference between getting the job done well and not getting it done at all. Even if you manage to get the wrong tool to work, the job often takes longer and produces shoddy results.
For just about any cooking situation, cast-iron cookware is the best tool for the job. You can use it on a stove-top, in an oven, over a fire, on coals, or with just about any other heat source. Properly maintained, it will last for generations. Even if it’s not been properly maintained, you can restore a cast-iron piece to working order without too much difficulty. And the best part of cast-iron is that the more you use it, the better it gets.
Some of the benefits of cast-iron include:
Extreme durability
High heat retention and inertia
Even heating across surface
Ability to withstand high temperatures
Non-stick surface (if properly maintained)
Increased dietary iron intake
Completely non-toxic
Unparalleled versatility
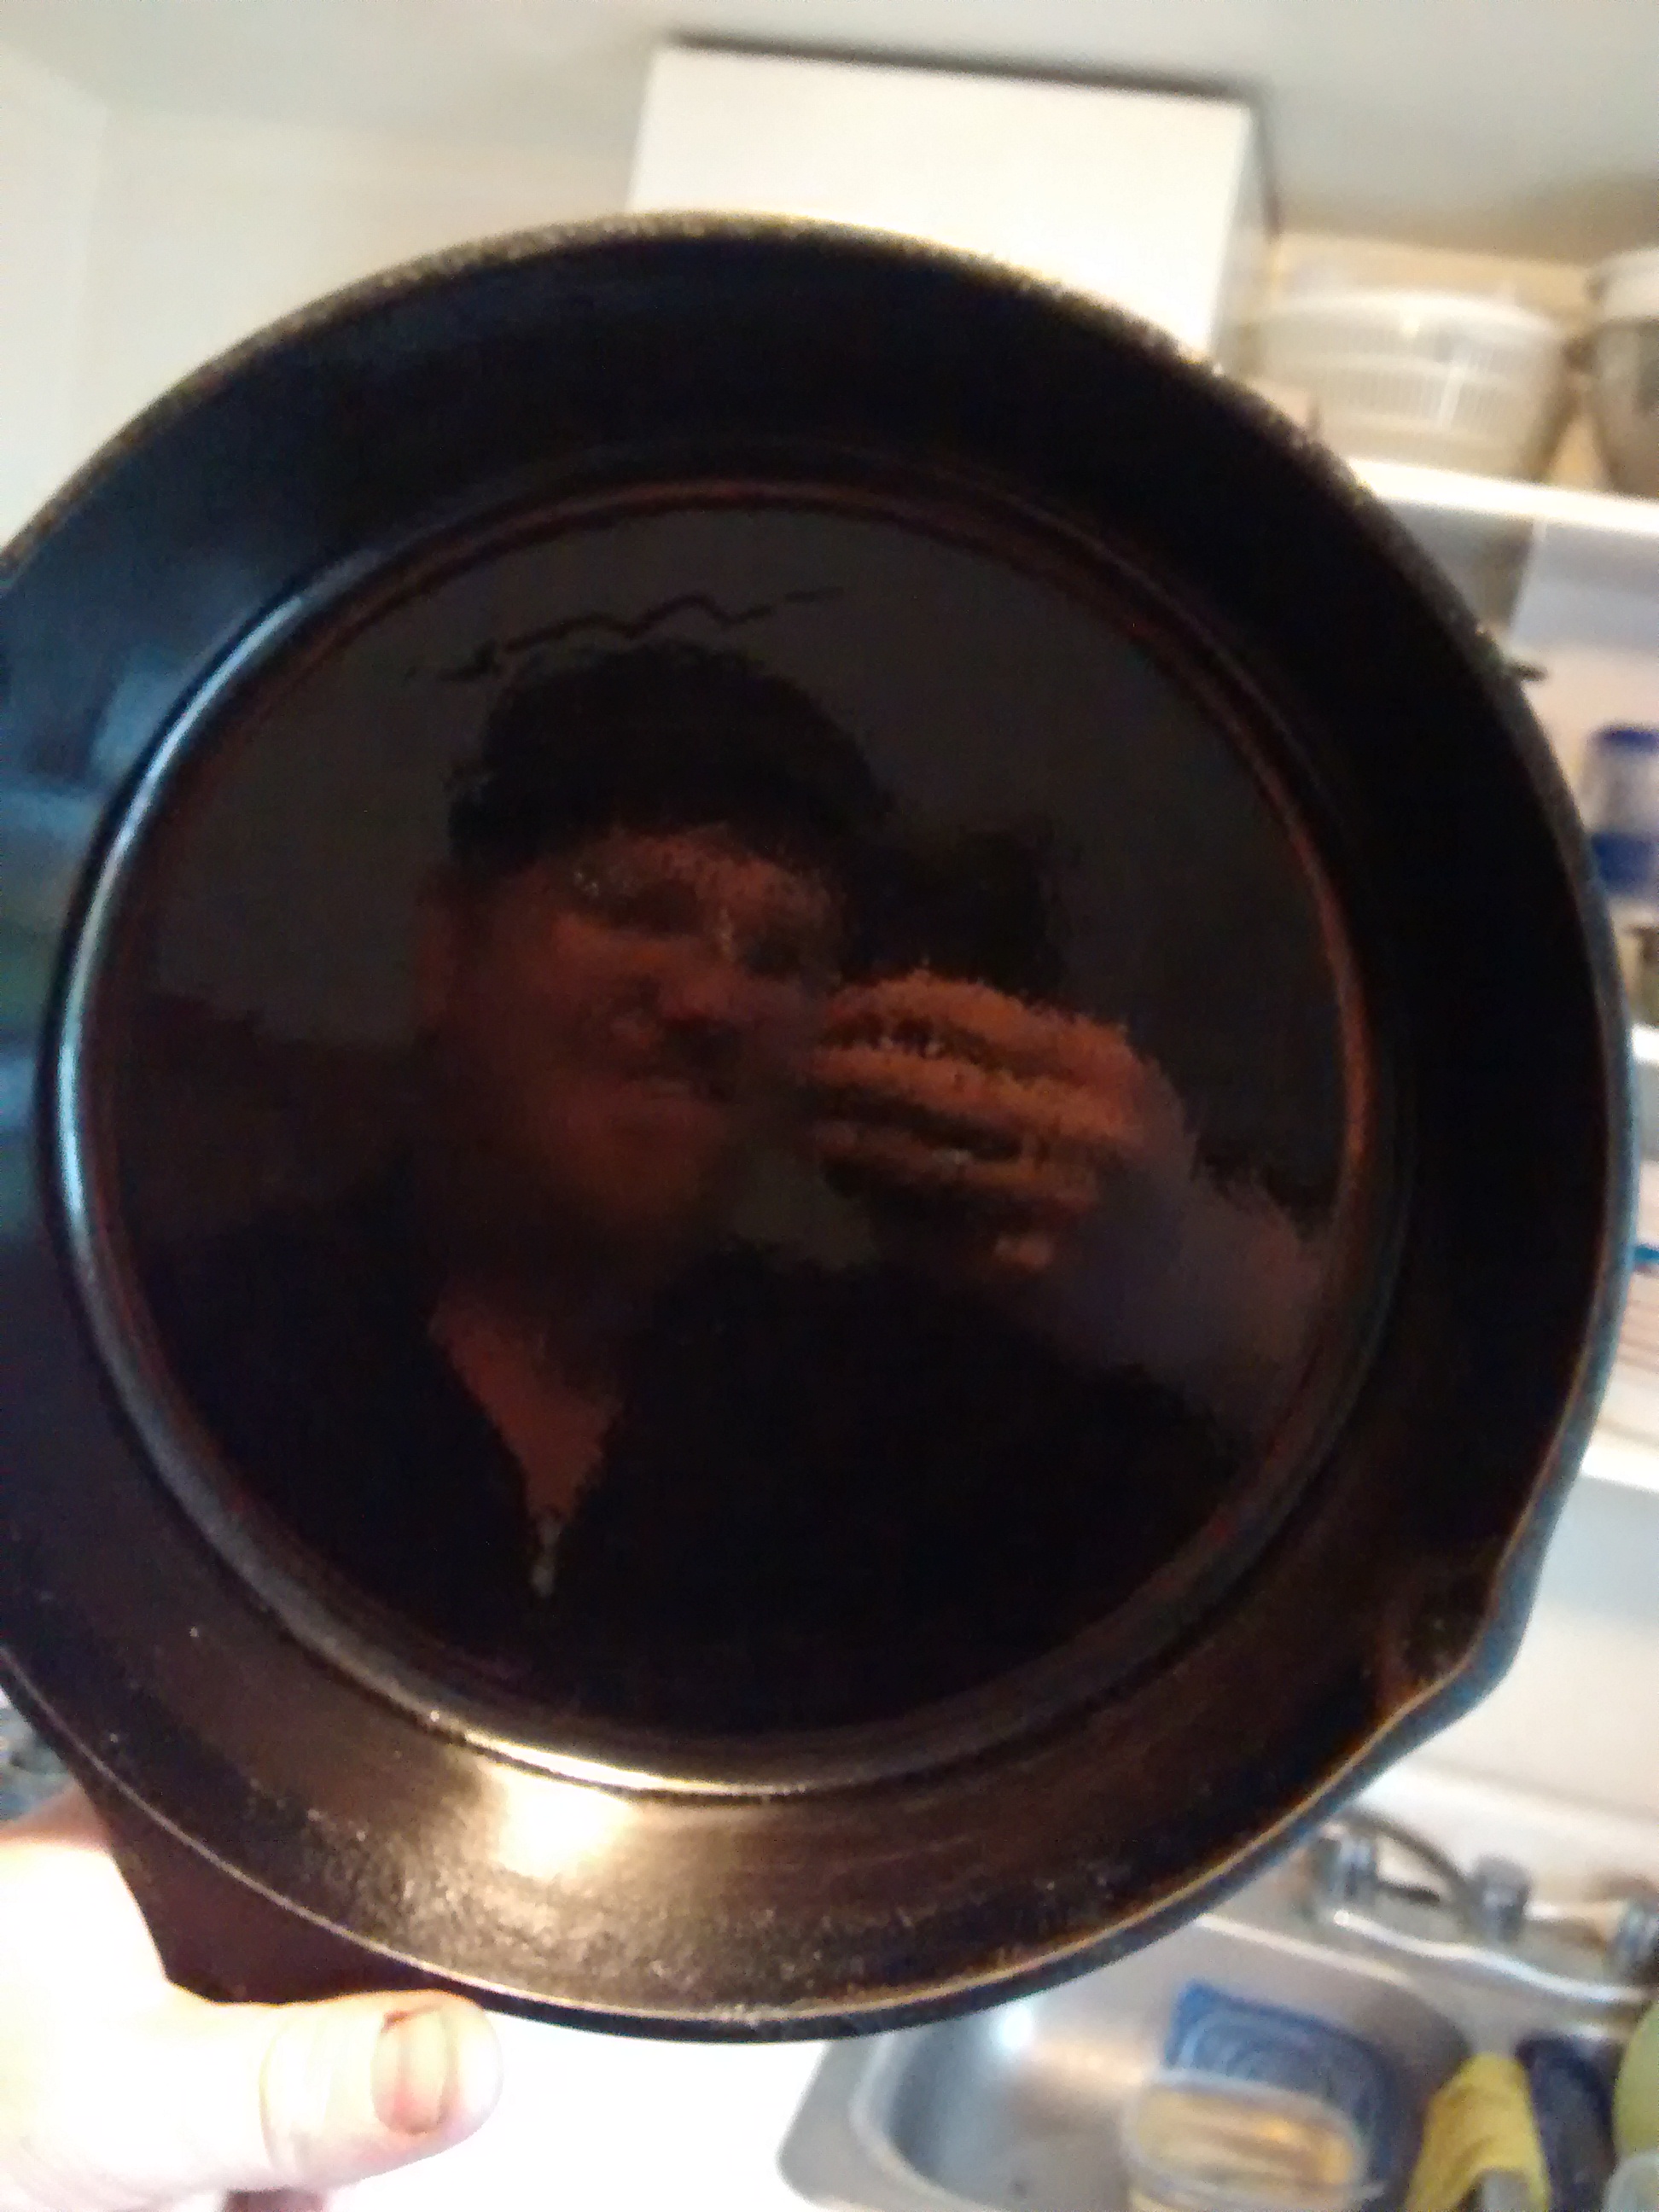
The non-stick properties of cast-iron are particularly remarkable. This is a selfie that I took off of the bottom of my cast-iron pan shortly after cooking with it. After rinsing off the excess food with water and seasoning it with a touch of olive oil, it’s as shiny and clean as a mirror—literally! The reflection is so good, I could use it to shave.
In my experience, cast-iron has a far better cooking surface than teflon or any other supposedly non-stick piece of cookware. When I fry up hash browns in my cast-iron pan, I can let the potatoes turn brown and crispy and still have virtually no problems lifting them off. With teflon, I get a giant mass of burnt starch all over the bottom. And I have never had any problems with eggs sticking to my pan at all.
Teflon pans are not nearly as durable as cast-iron. In just a year or two, the teflon begins to peel off and get into your food. That stuff is nasty—I certainly wouldn’t want to eat it.
In contrast, the only thing from a cast-iron pan that will get into your food is iron, which your body needs anyway. It’s safe to say that if you cook regularly with cast-iron, you will never be anemic. Also, cast-iron is durable enough that it will probably outlive you—no need to buy a new pan every few years. Investing in cast-iron is an excellent step towards self-sufficiency.
What are the disadvantages of cast-iron? Honestly, I can’t think of many, and when you dig down a little deeper, they aren’t disadvantages at all. The big ones include:
Cast-iron is heavier and more difficult to handle.
Proper seasoning requires large amounts of fats and oils.
It’s inconvenient to properly maintain.
The first point is undeniable. Cast-iron is heavy, and there’s no way to get around that. This is the main reason why my mom switched away from cast-iron and gave me the old family pan (thanks Mom!). But even though it’s heavy, it’s not impossibly heavy. I would chalk it up as a minor inconvenience, not a serious drawback.
The second point is also undeniable, though whether or not it’s a drawback is open to debate. I’m not a trained nutritionist, but there’s a lot of evidence coming out nowadays that our cultural obsession with low-fat diets is actually quite unhealthy. Our ancestors ate a lot more fat and a lot less sugar than we do, and on the whole it seems that they were much, much healthier.
In my own personal experiments, I’ve found that when I eat more fats (butter, lard, olive oil, bacon grease, etc), I tend to eat less, stay full longer, have more energy, and lose weight. Just now, I cooked up two strips of bacon and made an omelette in the grease. The meal was high in fat, but it had no added sugars, and in my own personal experience, that’s the important point. Ever since I made a conscious effort to replace the added sugars in my diet with fats, my health and fitness have improved.
So yes, you will have to use large amounts of fats and oils to properly season a cast-iron pan. If you’ve been eating a low-fat diet all your life, this may make you a bit squeamish. But is it unhealthy for you? In my experience, no.
The last point is just plain stupid. Yes, it takes a little bit of effort to properly maintain a cast-iron pan. So what? It takes a lot of effort to write a book, but that’s no reason not to do it. And believe me, it’s much, much easier to maintain a cast-iron pan than it is to write a book—even a bad one.
Seasoning
The most important part of maintaining a cast-iron pan is to keep it properly seasoned. An unseasoned pan will rust when it makes contact with water, since that’s what happens when you mix iron with water and oxygen. Seasoning produces a thin layer of oil over the surface of the iron, which repels the water and keeps it from getting in (kind of like the oil on your skin).
You season a pan by heating it and applying some sort of fat or oil. The heat causes the iron to expand slightly, widening the pores. When the iron cools and contracts, the lipid strands get caught in the pores. Thus, you get a thin layer of oil attached to the surface of the pan.
I’ve read all sorts of stuff on the internet about how to season cast-iron and which kinds of oils to use. Most of these sites recommend coating the cast-iron in oil and putting it in a preheated oven for several hours. With my pan, though, I never did that—after cleaning off the rust and scrubbing it thoroughly with salt, I simply started cooking with it.
The truth is that seasoning your pan is a continuous process, not a one-time event. Every time you cook, you should wipe it down with a little bit of oil or fat, and wait until the pan is fully heated before you begin to cook your food. I usually heat the pan up a little warmer than what I’m going to need, apply the oil, then turn down the heat and wait a couple of minutes before I start cooking. Using this method, I haven’t had any problems.
When you cook, a small amount of the seasoning layer comes off and gets into your food. This is normal and healthy. A little bit of iron flakes off with it, which is also healthy. Over time, this causes the bottom of the pan to become smoother, improving the quality of the pan. So the more you cook with your cast-iron pan, the better it gets.
Washing
Some cast-iron aficionados never wash their pans, ever. They prefer to cook with dirty pans, claiming that it “adds flavor.” Personally, I think that’s gross. I don’t always wash my pan, but if I’m going to make something like bacon and eggs after cooking stir-fry, I definitely wash it first.
The most important thing to remember when washing cast iron is to avoid using soap. The problem with soap is that it removes oil, so scrubbing your pan with soap will remove the layer of seasoning that protects your pan from rust. Some people say it’s okay to use dish soap if you wipe it down with oil after you dry it, but I’d rather not risk it.
If your pan is properly seasoned, you probably won’t have to use soap anyway. I’ve only ever used warm water and a rag, and it always cleans things up nicely.
The other thing you want to be careful about when washing is temperature shock. If you add water while the pan is still hot, it will put out a lot of steam and briefly cause the water to boil. This can make it easier to clean, but it also makes the iron contract rapidly, which may cause it to crack. For that reason, never use cold water on a hot pan: always use warm or hot water.
Metal Cookware
The last big thing to remember with cast-iron is to never use plastic cookware. Plastic melts, and because iron is porous, that plastic will get into your pan and into your food. I’ve also noticed that plastic will melt on other pans, which is really kind of gross and makes it a bad idea to use plastic cookware in general. But with cast-iron in particular, there’s simply no need.
The reason we use plastic cookware nowadays is because metal cookware damages teflon. But with cast-iron, that isn’t a problem. No matter how hard you scrape your cast-iron pan with a stainless steel spatula, you will destroy the spatula long before you cause any damage to your pan.
In short, cast-iron is amazing. It requires learning some new habits and possibly making a few lifestyle adjustments, but the benefits are totally worth it. If you want to become more self-sufficient, investing in cast-iron is an excellent step to take.
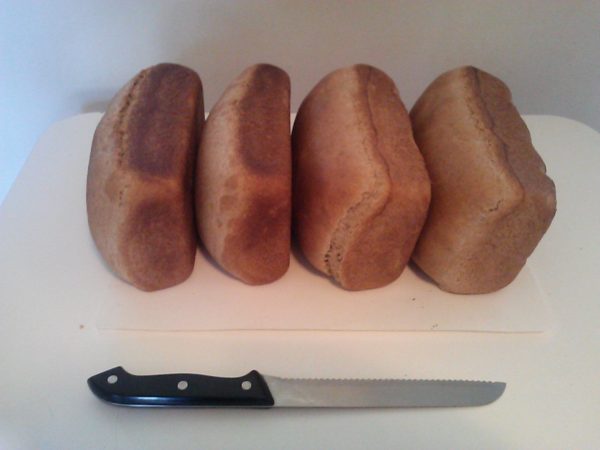
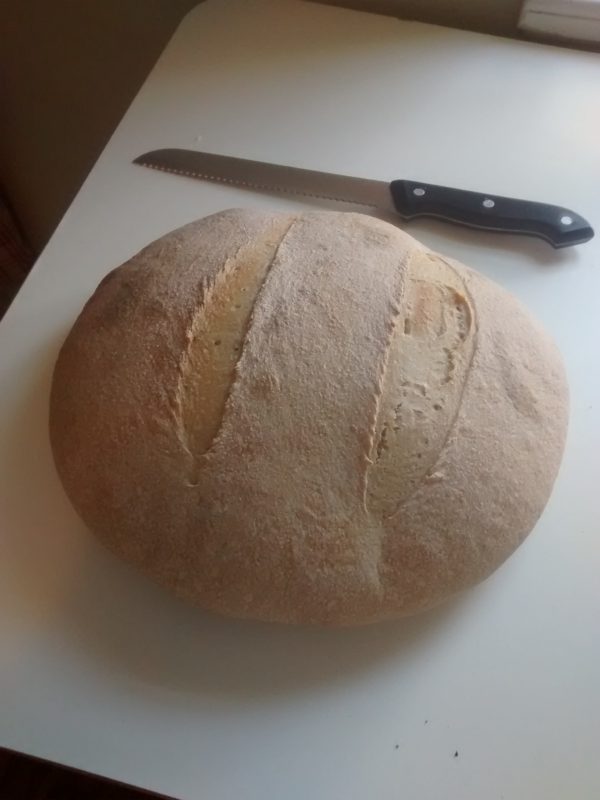
My first batch of homemade bread. It’s improved significantly since then!
Bread may not be the staple food in every culture, but it certainly is in mine. So when I decided I was going to become more self-sufficient, learning how to make quality bread from scratch was very high up on the priority list.
Bread is awesome for a number of reasons. It’s nutritious and healthy, comes in a variety of different styles and flavors, is relatively easy to make, and is made from ingredients that are cheap and easy to acquire.
Of course, some breads are better than others. Most of the criticism about bread being fattening and unhealthy are due to commercial breadmaking practices and can be totally reversed by making it yourself. People across the world have been eating bread for thousands of years; if it was fundamentally bad for us, we would have figured it out by now.
There is a huge difference between the modern commercial bread in the typical American grocery store and bread made by more traditional methods. I noticed this difference when I came back from living overseas. In Georgia, easily 40% of my diet was bread of some sort, so one of the first foods I bought on my return was a freshly made loaf from the local Smith’s grocery store. It was like eating air. Not only did the bread lack flavor, but it was remarkably unfilling compared to the stuff I’d become accustomed to.
Fortunately, after learning how to grind wheat, I was able to make bread that was just as good—in fact, probably better. Every Sunday, I bake a couple of loaves, freezing one for later (bread freezes extremely well) and using the other immediately. I’ve been baking bread on a regular basis for the last six months, and while I still have a lot to learn, there’s a lot that I can share.
So let’s start with the basic ingredients:
FLOUR
Flour is made from grain that has been ground to a powder. The typical grain for bread is wheat, though you can also make bread from rye, oats, rice, and other kinds of grains.
Source: Wikipedia CC BY-SA 3.0
A wheat kernal consists of three parts: bran, germ, and endosperm. Each one is perfectly edible. The bran is the outer shell, the germ is the embryo, and the endosperm is a nutritional package for the plant. If you compare it to a spaceship, the bran is like the hull, the germ is like the living quarters for the crew, and the endosperm is like the rocket fuel.
Whole wheat flour has the germ and the bran, but in white or all-purpose flour, those have been removed. Since the endosperm has very little fiber and is almost all carbs, bread made from this kind of flour is significantly less healthy and less filling. However, all-purpose flour tends to make bread sweeter (again, because of the carbs), so it’s okay to mix a little of it into your dough. But I wouldn’t want to eat a loaf made entirely from all-purpose flour.
When stored in proper conditions, whole wheat will last basically forever. To return to the spaceship analogy, each grain of wheat is like a tiny colony ship with the colonists frozen in cryo, just waiting to arrive at their new homeworld. As long as the hull doesn’t breach, everything’s pretty much good.
For this reason, wheat is perfect for long-term food storage. All you need is some way to grind it into flour, which you can then use to make bread at your leisure. The grinder I use is an old Magic Mill Plus III that I inherited from my parents. The thing is older than I am and sounds like a freaking jet engine when it’s running, but it gets the job done (some day, I’m going to build a pedal-powered wheat grinder that you can hook up to your bicycle, but that’ll deserve a whole post unto itself).
There are a lot of different varieties of whole wheat, but for our purposes, there are basically two:
Red wheat is denser and more flavorful, with a strong, hearty flavor.
White wheat is softer and lighter, with a less overpowering flavor.
There are other distinctions, such as hard wheat vs. soft wheat, winter wheat vs. spring wheat, etc, but I haven’t experienced any significant difference between those. The main distinctions I’ve found to be significant have been between whole red wheat, whole white wheat, and all-purpose flour.
WATER
Next to wheat, water is the most significant ingredient in the bread making process. It is entirely possible to make edible, nutritious bread from nothing but flour and water (including leavened bread, but more on that later).
To make good bread, it’s important to have the right consistency of moisture. Dough that is too dry will make a hard, dense bread that dries out and goes stale very quickly. Dough that is too wet will not hold its shape very well, which isn’t much of a problem for sandwhich loaves but can be a problem for artisan bread. Generally, though, it’s best to err on the wet side.
Dough that is the right consistency will be sticky, but not too sticky. Basically, it will cling to your hands and the table but not so much to make them super messy. Most homemaking blogs describe this consistency as “silky,” which makes no sense to me, since I have no desire to either eat silk or wear bread dough. Then again, I’m a man.
In order to preserve moisture, it is entirely possible to knead with water instead of flour. I picked up this technique from Melissa Richardson of The Bread Geek (and author of The Art of Baking with Natural Yeast, which I highly recommend). You basically wet your hands, run them over the dough, and knead as per usual. The water forms a lubricating layer which prevents the dough from sticking to your hands or the table. Just be sure not to let the dough sit for too long on the table, because it will start to stick.
YEAST
Leavening is the process by which little air bubbles are injected into the dough, making it light and spongey. If you don’t use a leavening agent of some kind, you’ll end up with crackers instead of bread (or worse, a solid brick). While it’s possible to leaven bread with baking powder or baking soda, the most common leavening agent is yeast.
Yeast is a single-celled fungi that turns sugars into ethanol and carbon dioxide through a process known as fermentation. When brewing alcohol, the ethanol mixes into the drink and the carbon dioxide dissipates into the air. When baking bread, the carbon dioxide is trapped in the dough to form air bubbles and the ethanol dissipates in the baking process.
This is where things get interesting. If you’re like me when I first started baking bread, you probably think of yeast as a packet of powdery brown stuff that you buy at the grocery store. But people have been baking bread for thousands of years. Where did they get their yeast before they had those little packets? And how can we be truly self-sufficient if we have to go to the grocery store every couple of months to get our yeast?
Commercial quick rising yeasts are a relatively new invention. The yeast you buy in the grocery store is a single isolated variety produced in a laboratory and optimized for just one thing: making bread rise quickly. But before commercial yeast, people used yeasts that they cultivated themselves—and these traditional yeast cultures do much, much more.
In a natural yeast culture, multiple varieties of yeast coexist symbiotically with a probiotic known as lactobaccilus. The lactobaccili promotes a mildly acidic environment which keeps out mold and allows the yeast to thrive. This environment also simulates the soil, neutralizing phytic acids in the wheat that bind up most of the nutrients—essentially tricking the wheat into thinking that it’s been planted. In addition, the yeast consumes many of the sugars that give the bread such a high glycemic index, and partially digests the gluten to make it more digestible for humans.
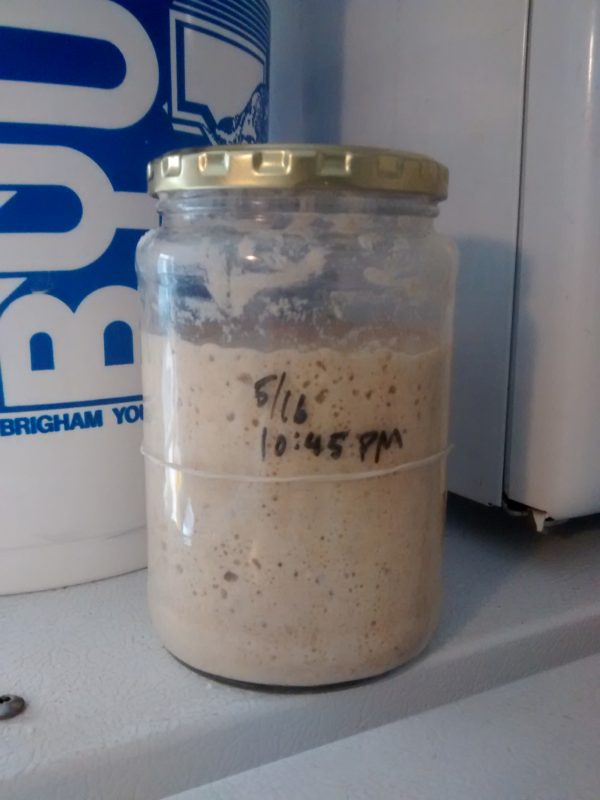
My sourdough starter which I made from whole white wheat and all-purpose flour. The rubber band represents the level that it started at, and the timestamp shows when it was last fed.
This natural yeast, also known as sourdough starter, makes for a bread that is healthier, tastier, more nutritious, and much more self-sufficient. You can use it to make almost any kind of bread, including breads that are mild and not sour. And to make your own culture, all you need is flour and water.
Wait—all you need is flour and water? But where does the yeast come from?
The thing about yeast is that it’s everywhere: in the air, on your skin, and on the skins of fruits and grains. The type of yeast that’s best for fermenting any kind of plant can typically be found on that plant. Thus, to make wine, you crush grapes and yet the yeast on the skin of the grapes ferment the juice. For bread, you essentially do the same thing: use the yeast found on the outside of the grain to ferment the dough you make from it.
To make your own sourdough starter, it’s best to start with whole wheat or rye flour, since those contain more yeasts. After that, you can also use all-purpose flour so long as it’s unbleached. Since chlorine can also kill yeast, it’s important to use water that isn’t chlorinated. You can do this either by buying bottled mineral water, or by letting a pitcher of tap water sit on the counter for at least 24 hours to let the chlorine dissipate.
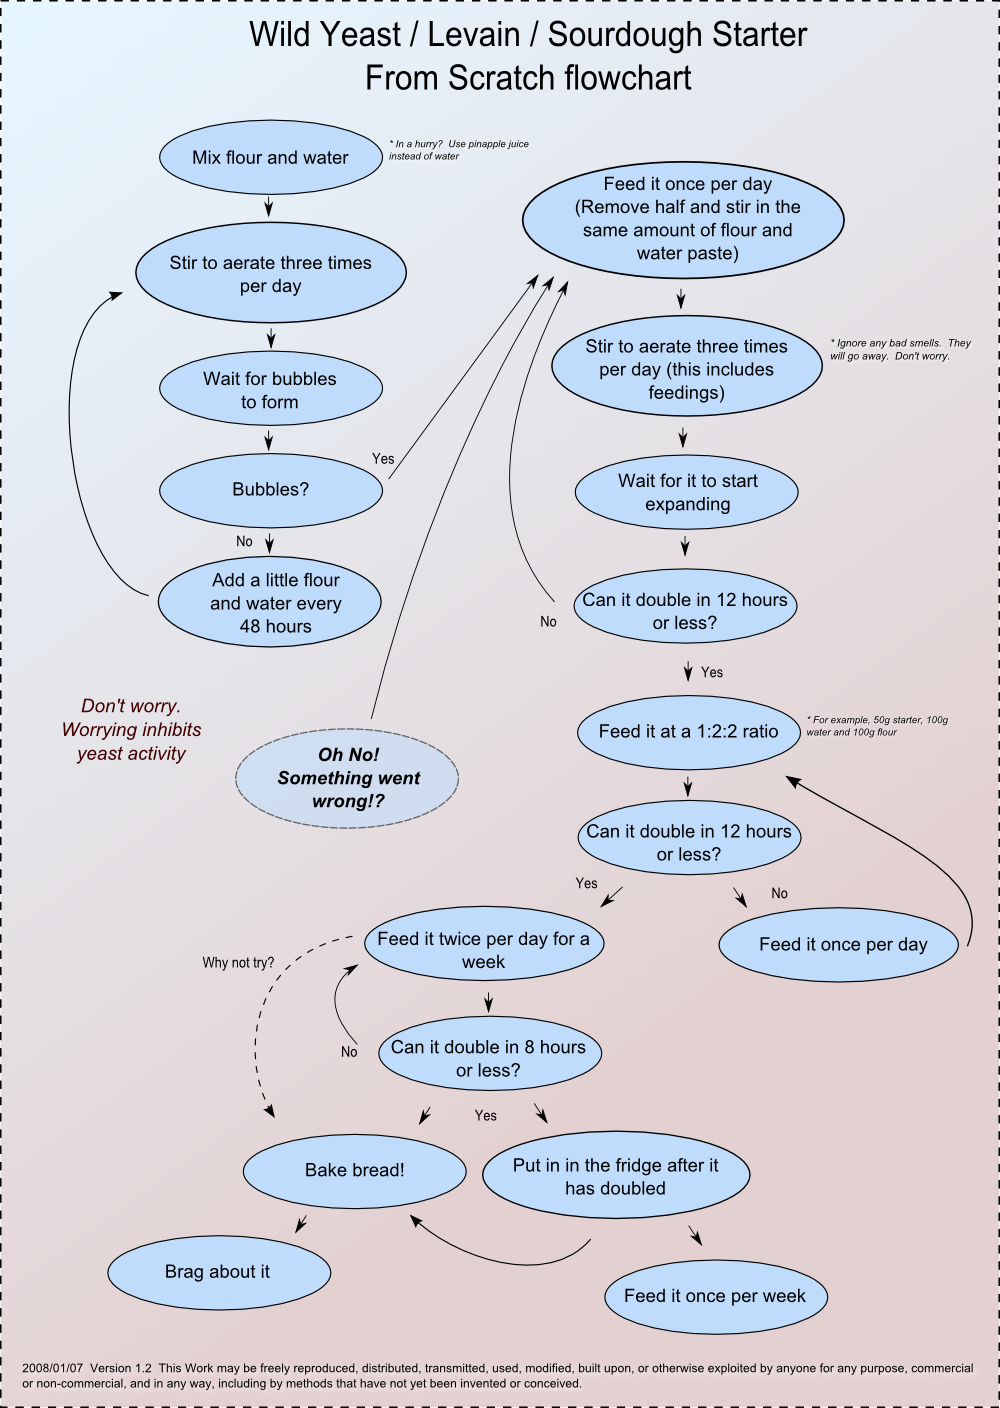
If you want to make your own sourdough starter, this chart shows the way to do it. For my starter, I just mixed flour, water, and starter at a 1:1:1 ratio every 24 hours, and at the end of the week, it was doubling in less than 8 hours. I’ve been baking bread with it ever since.
Sourdough starter can be kept on the counter at room temperature or in the fridge. A healthy culture will maintain itself, so as long as you feed it regularly, it shouldn’t go bad. Even if you neglect it for long periods of time, you may still be able to revive it. The only sure thing that will kill yeast is an oven, which is why in Alaska they call you a “sourdough” if you’ve lived there for at least a year.
Every starter culture has its own idiosyncracies, so you’ll have to play around with your own to get a feel for it. In general, though, sourdough starter follows this life cycle:
STAGE 0: Yeast has not yet consumed the flour. Bubbles are starting to form but dough has not yet doubled in size. Time on counter: 0-4 hours. Time in fridge: 0-1 days.
STAGE 1: Yeast population multiplies exponentially, overtaking the bacteria. Dough doubles in size and has a mild taste. Time on counter: 4-8 hours. Time in fridge: 1-3 days.
STAGE 2: Yeast population stabilizes and bacteria population begins to overtake it. Sourness increases by the hour. Time on counter: 8-24 hours. Time in fridge: 3-7 days.
STAGE 3: Yeast begins to starve. A layer of clear alcoholic liquid, known as hooch, appears on surface. Bacteria surpasses yeast and makes dough too sour to be usable. Time on counter: 24+ hours. Time in fridge: 7+ days.
The key ingredient with sourdough starter is time. To make a milder tasting bread, shape the loaves immediately after kneading and let rise only 4-6 hours (or until they just double in size). To make a more sour tasting bread, let the dough rise longer.
It is entirely possible to make good, nutritious bread from nothing but flour and water (in fact, that is how most artisan breads are made). However, you will probably want to add more ingredients in order to improve the taste and texture. Here are some of the other common ingredients that can go into bread.
SALT
Salt is a flavor enhancer: it basically amplifies whatever flavors are already in your bread. It also kills yeast, however, so adding too much will make it harder for your bread to rise. Most bread recipes typically call for no more than a teaspoon.
SUGAR
Sugar makes bread sweeter and can make the yeast grow faster. It also helps the bread retain moisture. When I bake bread, I typically use about half a cup of white or brown sugar for two loaves.
I have read somewhere that with sourdough starter, sugar is completely consumed by the yeast and does not of itself make the bread any sweeter. I have not found that to be the case. My first test loaf with sourdough starter was made without any sugar, and the second test loaf was. The first loaf was too sour, but the second one was sweeter and more palatable. If the sugar had been completely consumed, the second loaf should have been more sour because it would have accelerated the yeast’s life cycle.
The yeast in a sourdough culture is optimized to eat whatever it is that you feed it most regularly. If you feed it mostly flour, then it will be optimized to eat flour, not sugar. If you switch to feeding it rye, then the rye-consuming yeasts will overtake the wheat-consuming yeasts and over time your starter will be optimized for rye. This is why it’s kind of pointless to make sourdough starter from grapes or raisins. The yeast on grapes is not optimized for flour, and will be overtaken anyway once you start feeding it flour, so you might as well just use the flour to begin with.
Bottom line, sugar makes bread sweeter.
MILK
In most bread recipes, you can substitute a portion of the water for milk. This will make the bread softer and lighter, just like adding milk to an omelette will make it softer and lighter.
You can also glaze the top of your bread with milk immediately before you bake it. This will make the crust darker and give it more flavor. You can use other things to glaze your bread, but I prefer milk because it browns the crust only slightly without making it too thick.
EGGS
In generally, eggs help baked goods to hold together better. If you’re having problems with your bread getting too crumbly or falling apart, one way to solve that would be to add an egg.
Like milk, eggs can also be used for glazing. The yolks thicken the crust and give it a golden color, while the whites give it a shiny sheen.
BUTTER/OIL
Fats and oils lubricate the gluten in bread, making for shorter gluten chains (hence the word “shortening”). In practice, this means that bread made with oils or fats will be softer and lighter, with smaller, more uniform air bubbles. Breads made without fat, such as French bread, will be tougher and chewier with large air bubbles. Use enough fat, and you’ll end up with cake instead of bread.
Butter is a special case because its melting point is roughly body temperature. This means that butter enhances texture, since it melts in your mouth when you eat it. Butter can also be used to glaze your bread both before and after baking. For that reason, butter is the most convenient way to glaze bread.
For sandwich loaves, I prefer to use olive oil because of the flavor it imparts. Olive oil has a very distinctive flavor that translates quite nicely into finished bread. It’s more of a savory flavor, though, so for sweet breads, I prefer to use butter.
I try to avoid unnatural oils like margarine, shortening, and vegetable oil. I don’t have any proof that they’re bad for you, but I just don’t trust them. Besides, they don’t taste nearly as good as natural fats like butter, lard, and olive oil.
So much for the ingredients. Now let’s move on to the basic breadmaking techniques:
SIFTING
When flour sits in a container for a long time, it tends to settle and become dense. Sifting helps to lighten the flour by mixing air in with it, making it easier for the flour to mix with other ingredients.
An easy way to sift your flour is to mix all your dry ingredients in a separate bowl from the wet ingredients and mix it all together with your hand. Get a feel for the flour and stir it until it’s at the consistency that you want.
If you do not sift your flour before mixing it with the wet ingredients, your bread will be denser and less uniform. So sifting is definitely a good idea.
KNEADING
Kneading is a process of stretching and folding that gives bread its texture. It takes a lot of effort to do it by hand, but it’s worth it, since bread that isn’t kneaded properly will crumble and fall apart.
Gluten forms when glutenin and gliadin proteins in the flour cross each other, forming long chains. These gluten chains form the matrix that traps the air bubbles and allows the bread to rise. Longer chains can trap more air and hold your bread together, making it stronger and less crumbly.
The way to know when your dough has been kneaded enough is to run it through the windowpane test. Stretch a small bit of dough between your fingers and see how thin you can stretch it before it breaks. If you can stretch it thin enough to see light through the other side, your dough has been kneaded enough.
If you’re kneading by hand, it’s almost impossible to overdo it, so I knead all my dough for at least ten minutes. After a while, you get a pretty good feel for it, so that you can tell when the dough is ready just by handling it.
SHAPING
Shaping loaves can be tricky. If you’re not careful, you can end up with massive pockets of air inside your loaf. It can be a real pain.
I used to shape my loaves by flattening the dough out and rolling it up, but I ended up with some massive pockets that way, so I don’t do it that way anymore. Instead, I form a ball with the dough and roll it around for a minute or two to make sure that it’s uniform. Then, I stretch the edges of the ball out and roll it lengthwise to give it the proper shape.
Artisinal breads call for different shaping techniques. They may also call for scoring the surface of the bread immediately before baking. Since yeast multiplies rapidly just before it dies, bread tends to expand in the first few minutes of the baking process. Scoring it helps to control where it expands, so that you don’t get a misshapen loaf.
BAKING
The baking process is pretty straightforward: set your oven to a certain temperature and put the bread in the oven for a set amount of time. Different recipes call for different times and temperatures, though, so its important to pay attention to that.
I’ve found that most breads do well at 350° F for 30-35 minutes. Flatbreads such as pita need a much shorter baking time as well as a higher temperature, since they aren’t nearly as thick and have a larger evaporative surface. Some breads like scones, tortillas, and English muffins are made on a stovetop and not an oven. However, the same general rules apply: thicker breads need to cook longer at lower temperatures than thinner flatbreads.
To make bread with a thick crust, add an oven-safe bowl or container with a couple of inches of water inside of it. This generates steam inside your oven, which significantly boosts the crust.
It’s also important to allow your bread time to cool off before you cut into it. This is because the steam inside of the bread still bakes it after you’ve removed it from the oven. Cutting into a loaf of bread too soon will make the inside sticky, and cause it to dry out faster.
My first loaf of San Francisco sourdough bread. This stuff tastes fantastic!
That is pretty much everything I know about making bread. There’s a bit of a learning curve, but it is definitely worth it.
Learning how to bake my own bread allowed me to cut my monthly food budget by at least 25%. Wheat is incredibly cheap (only $7 for 25 lbs at the LDS Home Storage Center—that’s enough to last me about three or four months), and whole wheat bread is significantly more filling than the white stuff. Also, the taste of homemade bread is AMAZING. I cannot go back to the bread in the store—the homemade stuff is just too good.
Better, healthier, more filling food at a fraction of the cost—that’s what it means to be self-sufficient with bread. I’ll leave you with my basic recipe:
BASIC WHOLE WHEAT BREAD
2-3 cups sourdough starter
2-3 cups warm water
.5 cup sugar
.25 cup olive oil
3-4 cups white wheat flour
3-4 cups red wheat flour
.5 tbsp salt
Sift 6 cups flour and salt in a large mixing bowl. Leave some flour aside for kneading.
Mix starter, water, sugar, and oil. Add to dry ingredients to form dough.
Knead for at least ten minutes, adding flour until consistency is slightly sticky.
Shape loaves and place in greased bread pans. Allow 4-8 hours to rise.
Bake at 350° F for 35 minutes. Glaze with butter and set aside to cool.
For mild bread, bake as soon as loaves double in size. For sour bread, allow more rise time.
For various reasons, after a year I decided to come home from overseas and move back to Utah. A lot had changed in that year, and my books were starting to earn enough that I could cover all my publishing expenses and pay myself a small salary. It wasn’t much, but the cost of living in Utah is much cheaper than it is elsewhere in the US, so I figured I’d make it work.
Right away, I started looking for ways to cut my expenses. When you’re self-employed doing what you love to do, cutting expenses is the difference between living the dream and working a dead-end job that you hate. I realized very quickly that one of my biggest expenses was food.
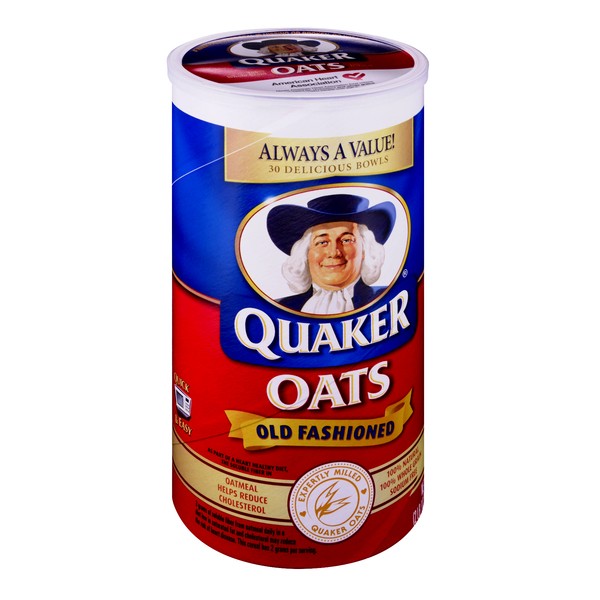
Backtrack a little bit. For most of my life, I’ve been a huge fan of breakfast cereal. In fact, my parents tell me that that was my very first word: “breakfast cereal.” But the thing about breakfast cereal is that it’s expensive. When I graduated college and my dad told me I was financially on my own, I realized very quickly that my cereal habit was making me broke. So I switched to oatmeal.
At first, I bought my oats in tins like this. The price was reasonable, and it lasted much longer than a box of cereal. But then I started shopping at a whole food store, and I realized that oats were much cheaper if you buy them by the pound. Some stuff you don’t want to buy that way, but oats are oats, so it really doesn’t make much of a difference where you buy them. So I switched.
Fast forward to 2013. While browsing through the grocery store looking for ways to cut my food expenses, I found one of these:
A fifty pound bag of anything is prone to give you sticker shock, but when I calculated the price per pound, I realized that the value was almost twice as good as the stuff I was buying at the whole food store. And since I had completely switched to oatmeal by this point, I knew that I would eat it.
I stood there and thought about it, checked the price again and thought some more. Then I threw caution to the winds and loaded the 50 lb bag into my cart.
The great thing about oats is that if you store them right, they will keep for decades. When food goes bad, it’s usually because something else (mold, fungus, bugs, etc) is eating it. That’s all mold is: a really disgusting organism that’s eating your food while it sits there in the fridge. In order to live, these organisms need water and/or oxygen. Since rolled oats are a dry food, if you store them in a sealed container without any oxygen in it, you can keep out the mold and the bugs practically forever.
After I hauled this giant cement-bag sized thing of oats to my third floor apartment, I realized very quickly that I needed to figure out a way to store it. Fortunately, my dad knew exactly what to do. He told me to get some dry ice, put a 1 lb. chunk of it in the bottom of a lidded bucket, and fill up the bucket with oats. Dry ice is carbon dioxide in a solid form, which sublimates (turns to gas) at room temperature. Since carbon dioxide is denser than oxygen, as the ice sublimates it will fill up the bucket from the bottom up, pushing out all of the oxygen. Put the lid on the bucket but leave it partially open, to allow the gas to escape. When you can seal the lid without the bucket starting to bulge, that means the ice has all sublimated and the bucket is ready for long-term storage.
So that’s what I did. I bought a bunch of cheap 3-gallon empty ice cream containers from the BYU Creamery, a small local grocery store owned and operated by BYU. They sell the buckets for $.50 each, so I got five and sealed up four of them after removing the oxygen with the dry ice. I then took the internet for more oatmeal recipes and came across The Oatmeal Artist, where I discovered all sorts of great recipes. Who knew you could do so much with oats?
That was how I got started with food storage. Though I have to backtrack again in order to explain.
I grew up in a devout Mormon household, where we practiced our religion as faithfully as we could. One of those principles is food storage. The idea is that in order to best help others, you first have to help yourself. Self-reliance enables you to provide for yourself and others through times of hardship and trial. By keeping this principle, the Mormon pioneers were able to thrive in a desert wilderness more than a thousand miles from civilization.
Food storage is an important component of self-reliance, not only for the major emergencies like the zombie apocalypse, but for the personal emergencies like declining book sales and a stalled career. If you only buy your food one or two weeks in advance, you’re living hand-to-mouth—literally. If you can learn how to store some of that food long-term, then even if your income streams dry up, you know that you’re still going to eat.
The #1 principle of food storage, though, is to eat what you store and store what you eat. These days, it’s pretty typical in a faithful Mormon household to have a couple buckets of rancid wheat in the basement that no one has opened in decades. We keep food storage because our religion teaches us to, but we don’t really know what to do with it because we never actually eat from it. The principle becomes just another empty practice—another rote tradition.
I knew right from the start that I didn’t want to do it that way. For one, I couldn’t afford to. But as I learned to store food that I actually liked to eat, I found that it reduced my food expenses significantly. Instead of buying oats every couple of weeks, I just gradually ate through what I already had. Since I ate oatmeal every day, and since buying in bulk cost roughly half as much as buying it by the pound, I came out ahead.
From oats, I expanded to other dry foods like rice and beans. Both of those are also easy to store long-term, and a 20 lb bag give you a significantly better value than the smaller bags (especially if you buy it on sale). I also expanded into wheat, which deserves a whole blog post of its own. And later on, I got a slow cooker to help with cooking the beans. If you’ve never cooked beans in a slow cooker, you don’t know what you’re missing. More on that in another post.
The best prices you will ever find for bulk dry goods is at an LDS Home Storage Center. It’s part of the religion, after all—many of the people who work there are volunteers doing missionary service. The last time I went there, it was $10.00 for a 25 lb. bag of oats—that’s only $.40 per pound. Beans, rice, wheat, and pasta is similarly cheap. Most of the Home Storage Centers are located in the western United States, but you can also order the products online. Or if you prefer, you can also find most of this stuff at your local grocery store.
Through food storage alone, I was able to cut my monthly food expenses by 25%. I also had the peace of mind of knowing that I would never have to starve for my art. Even if times get tough, I now have enough of a food security buffer to ride it out.
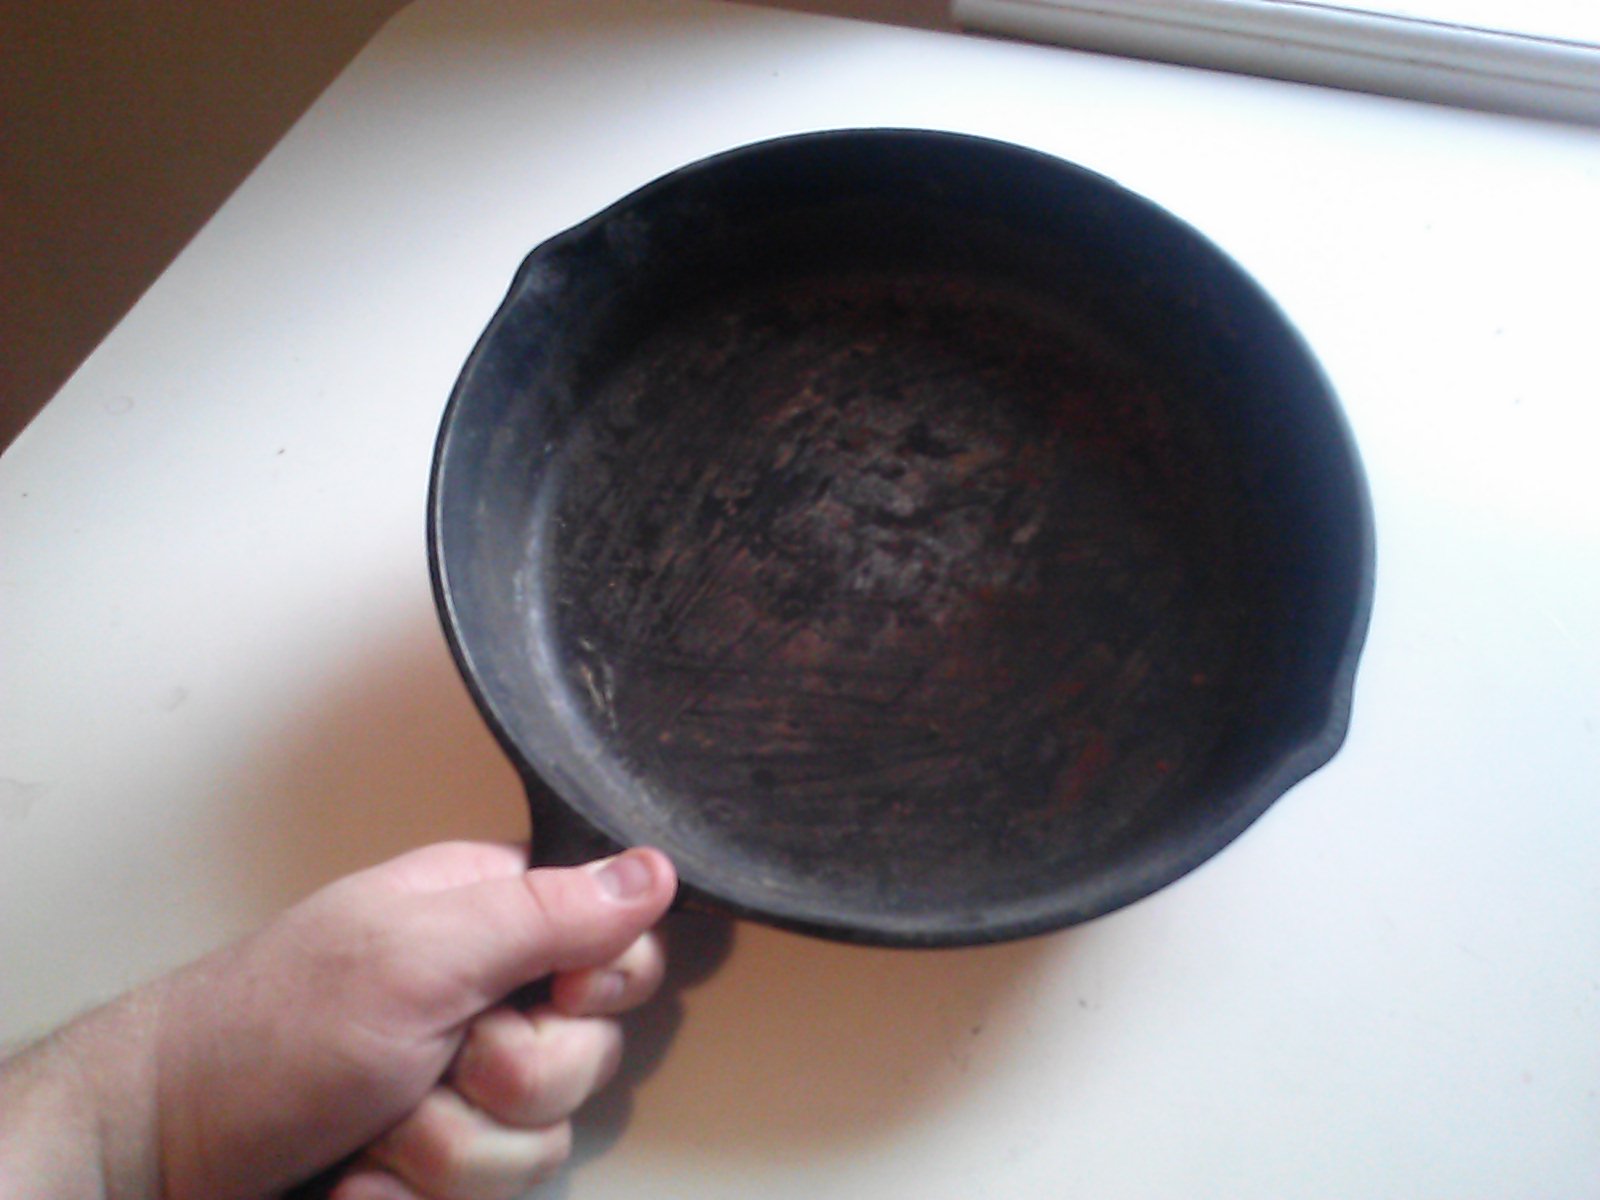
So a little while ago, I mentioned how my parents had sent me their old cast-iron skillet. It had been sitting in the basement unused for the better part of a decade, and had gunked up pretty bad with rust and other stuff.
Well, I’m happy to say that I got it cleaned up! Toad, a friend from my short story writing group, helped me out with it. We poured a bunch of salt into the bottom as an abrasive and scrubbed it down with a rag and some oil. After that, we fried some eggs up, seasoning the skillet with oil both before and after (we didn’t even bother seasoning it in the oven, just did it all on the stove top).
Right away, we could tell that this was a good quality piece of cast iron. You can tell by how smooth the surface is. The cheaper modern and/or Chinese stuff has a fairly rough surface, so that food tends to get stuck in it. The good old-fashioned skillets are much smoother.
I’ve been cooking regularly with it ever since, and I can confirm that these things only get better with use! Here are a couple of things I’ve been cooking with it:
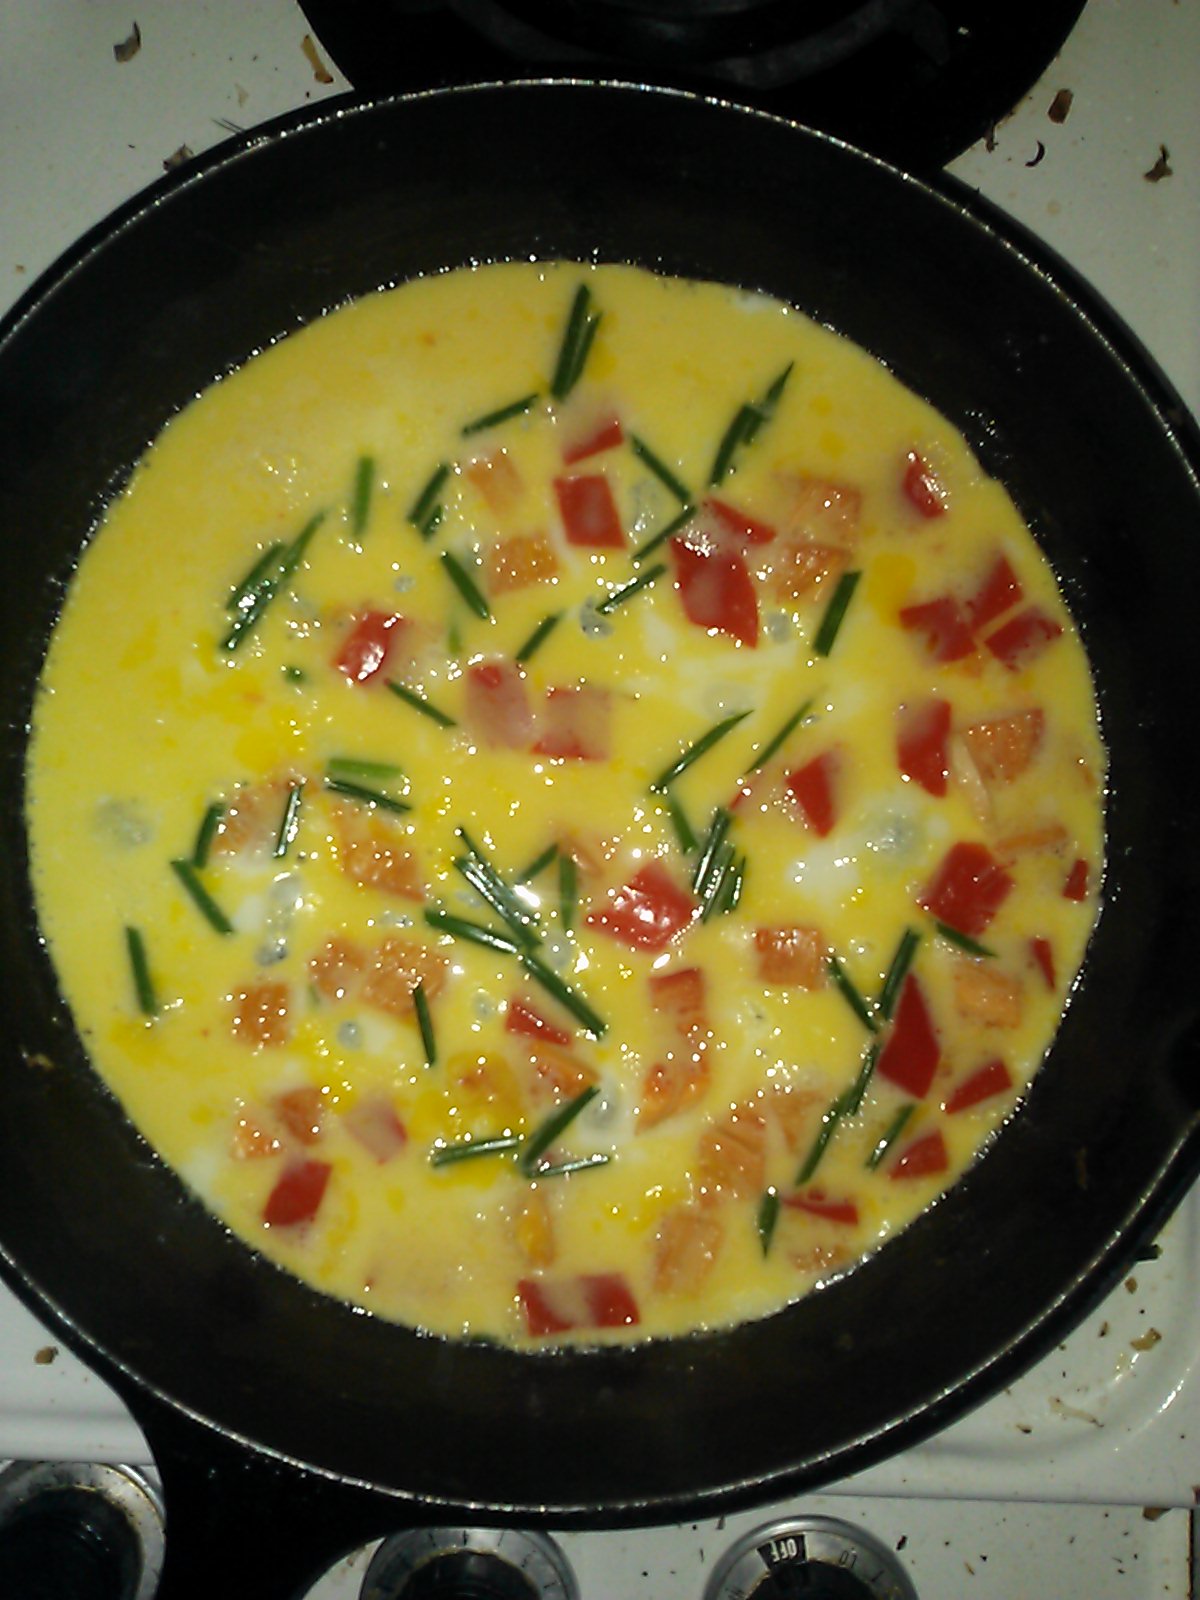
I love omelettes, but it’s hard to cook them in old teflon pans because the eggs tend to stick (or worse, the teflon peels off into the food). However, in my cast-iron skillet, it’s not a problem at all! In the picture above, I mixed two eggs with chives, red pepper, garlic salt, and a splash of milk. Later, I added a sprinkling of cheddar and mozzarella. To oil the pan, I used about 2/3rds tablespoon of butter.
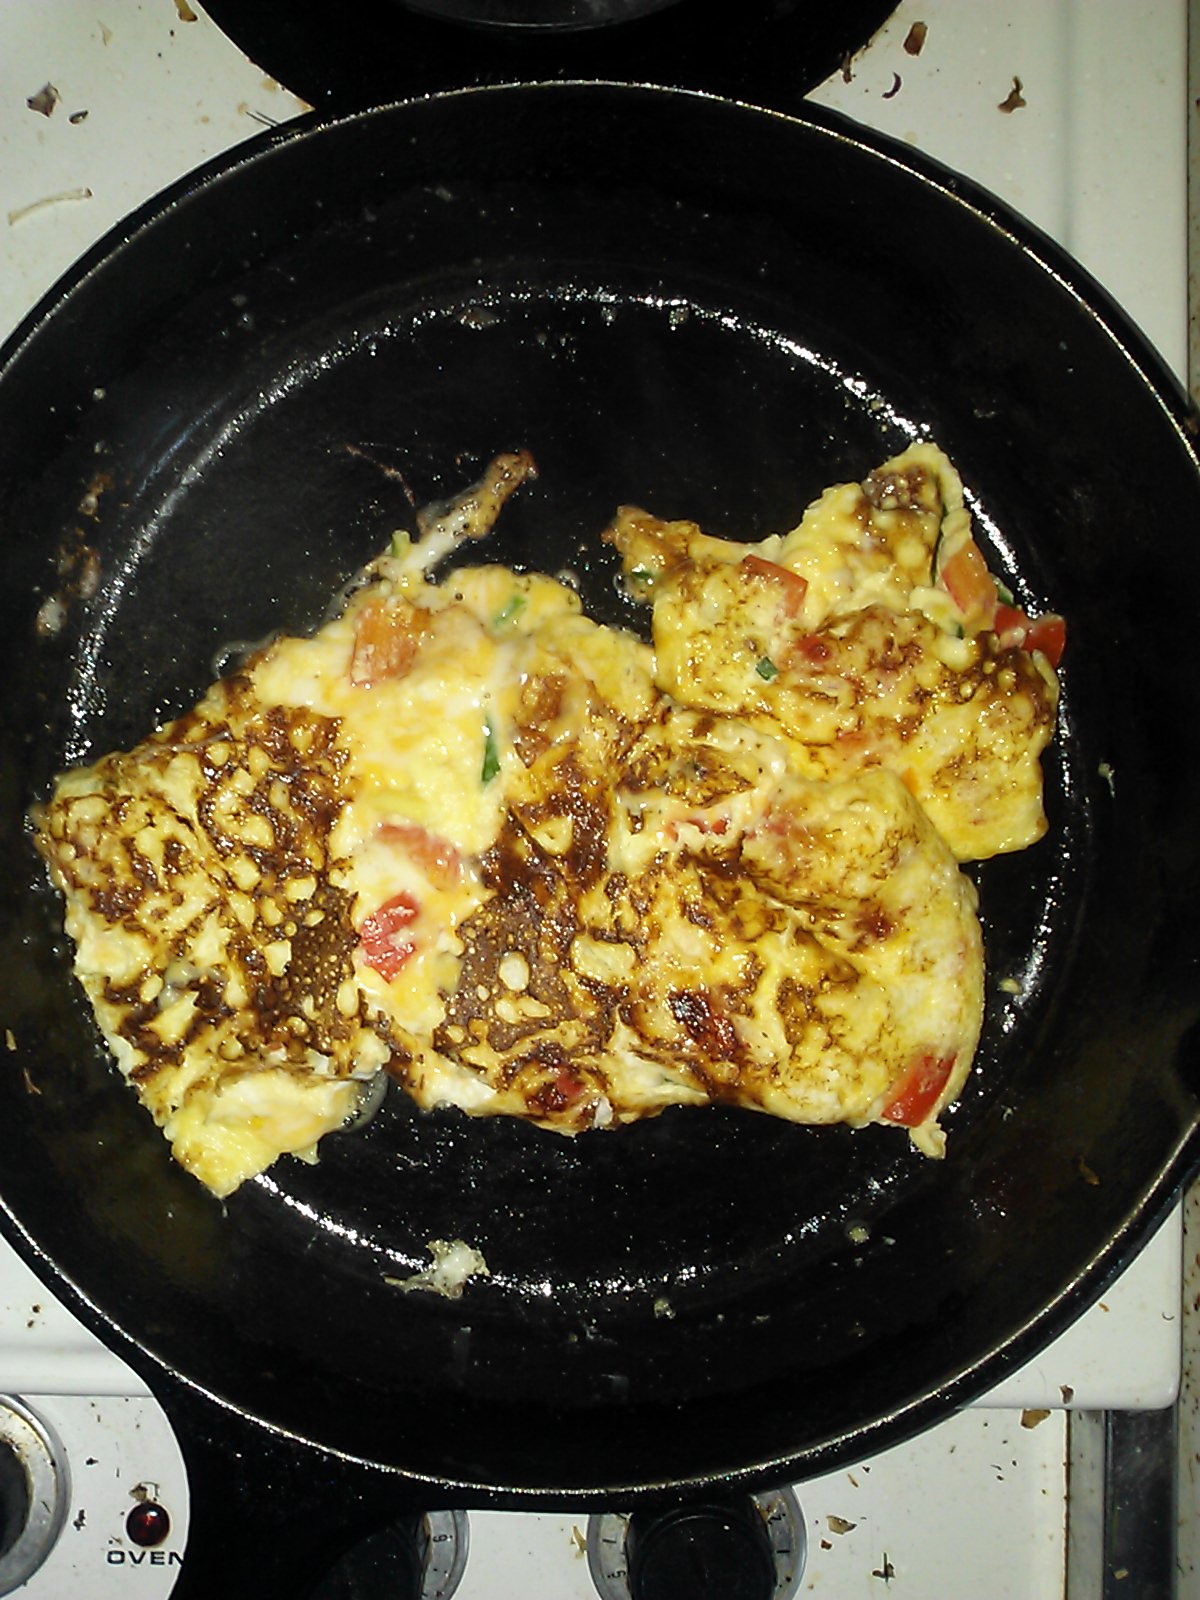
I’m not very good at turning these things over, but as you can see it’s not really sticking to the pan at all. If it does, it’s not hard to scrape it off. I use only metal cookware with this skillet, so I don’t have to worry about melting plastic (ever notice how an old plastic spatula tends to have a sharp edge with bits of plastic peeling off?). And honestly, it doesn’t take much work to scrape food off of this thing, even when it does stick.
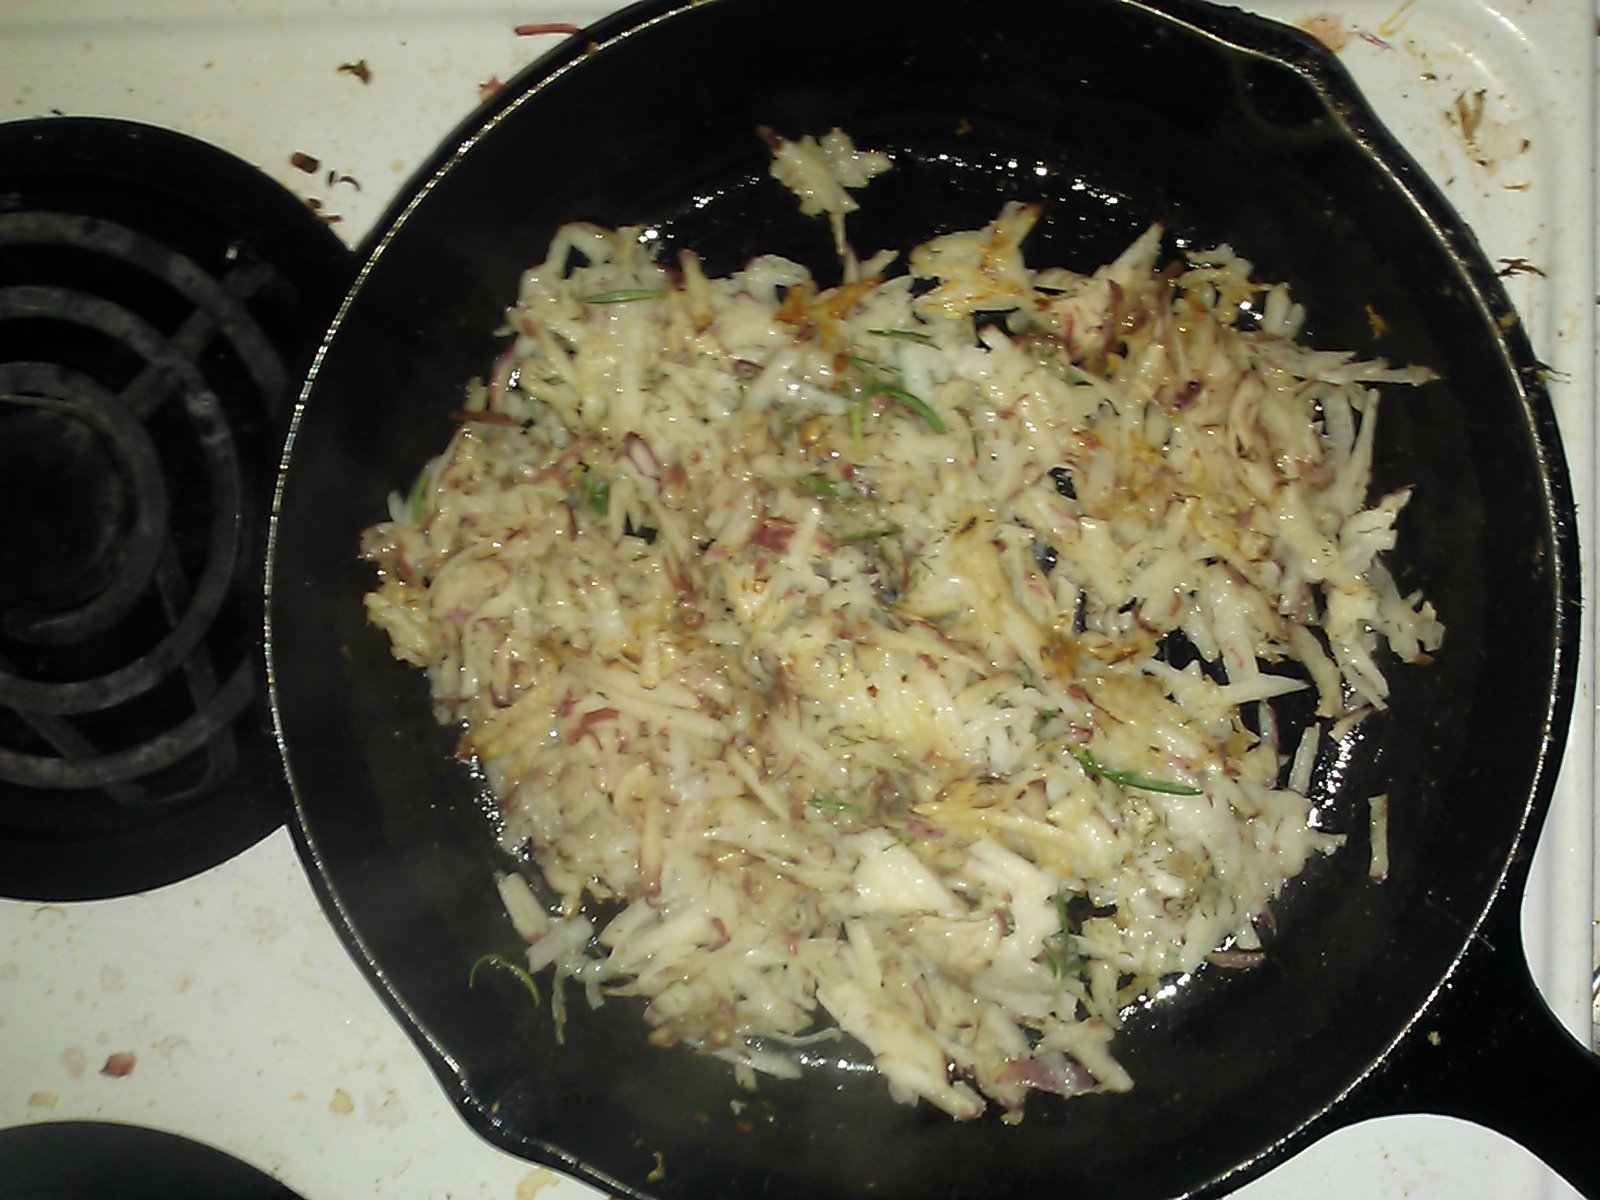
Another thing I love to cook in my cast-iron skillet is hash browns. I’ve got a small herb garden in my kitchen window, so I fry up my potatoes with rosemary, chives, and dill. It tastes FANTASTIC.
With my old second-hand teflon pans, I could never get the potatoes very crispy because they’d always stick to the pan if I cooked them for too long. But with cast iron, that isn’t a problem at all! As you can see in the picture above, these potatoes are browning quite nicely.
But that isn’t even the best part.
See that? It’s a selfie I took in the bottom of the pan after cooking all the stuff above! I didn’t wash it at all, I just dropped a little bit of oil on it and used a paper towel to wipe it down.
I’m telling you, this cast-iron skillet is AMAZING. I can cook whatever I want in this thing! Even better, I fully expect that this skillet will outlive me. It’s WAY more durable than any other piece of kitchen equipment that I’ve ever seen. And it’s versatile, too–I can hardly wait to go camping with it!
Today I wrote about 2.6 words in my current WIP (Sons of the Starfarers), which didn’t really feel like it because I was constantly getting distracted. Still, 2.6 words is pretty solid–it’s about mid-range for me. If I can hit that every day from here on out (which is doubtful, but hey), the rough draft should be finished before the end of the month.
The crazy thing is that I just hit the inciting incident at the end of today’s writing session, after passing the 6k word mark. For a mid-sized novella, that’s pretty late. In the classic three act structure, the inciting incident usually hits between the 12%-15% mark, but this one is well past 20% for a 30k word novella–and just barely at 16% for a 40k.
So in layman’s terms, how long is this book going to be? Probably longer than any of the Star Wanderers stories, but not quite as long as Genesis Earth. It probably won’t turn into a full-fledged novel, since there’s only one viewpoint character, but I can already tell that it’s going to flirt with the line between novella and novel.
We’ll see how it turns out. I’m still really excited about this story, and even though I don’t have a clear idea how to write the ending, I do know exactly how it’s going to end, if that makes any sense. I’ve got a clear idea of the series arc that this book is going to set up, but I don’t yet have a clear idea of the book’s self-contained arc. Once I figure that out, maybe I’ll be able to trim it down to a 30k novella after all.
I visited the Stadium Farmer’s Market in Provo for the first time today. It was pretty neat–lots of great produce, a nice community atmosphere, and a few quirky things like Jalapeno Jelly and tie died baby jumpers that you can’t really find in a mainstream grocery store. I came away with some excellent peaches and a hankering to come back next week for more.
Anyhow, the trip got me thinking how indie publishing is kind of like a farmer’s market. You’ve got everything from the guys who sell their produce out of unmarked paint buckets (writers who toss their books up to amazon with hardly a thought) to the local farm operations with pretty banners, pretty baskets, and laminated fact sheets drilling down on every possible difference between Elberta and Briscoe peaches (writers who go to great lengths to organize their own small presses and become Facebook/Twitter/Blogging personalities).
Almost everyone gives away free samples, which actually does a lot to drive sales. In a similar way, most indie writers either have a couple of perma-free titles or free-pulse their books. Everyone at the farmer’s market tries to be friendly and reach out to the customers (kind of like authors on Facebook and Twitter), but for me personally this kind of drives me away. A good entertaining sales pitch, though, can be quite interesting. I listened to the guy selling honey for almost twenty minutes, going on and on about his wares. It’s clear he’s in a business that he loves.
Even though the fruit in the farmer’s market tends to have more blemishes than the stuff you find in the mainstream store, it is WAAAY more fresh and delicious. Similarly, the stuff from the mainstream presses might be a lot more edited and polished, but the true innovation and formula-breaking stuff is happening in the world of self-publishing. Publishers want things to be more predictable and formulaic so that they can have a better idea how something is going to sell, but indies are free to try almost anything.
Those aren’t the only parallels, either. The more I think about it, the more it seems that being a self-published indie writer (or “author-publisher,” a newer term that I think I actually prefer) is a lot like being a local small farmer. I’m sure there are differences, but the similarities are quite striking.
And now I’m really wishing I’d bought some of that honey.
So I have a bunch of ideas for blog posts I’d like to write, and I’ll probably get around to them eventually, but I thought I’d drop a line now just to let you all know what I’ve been up to. It’s been a pretty good week, with some decent progress on the current WIP (Lifewalker) and some other random stuff that may be of some interest.
First, Lifewalker. It’s coming along quite well. I’m averaging around 2k words a day, so more of a leisurely pace than a white-hot creative heat, but not too bad. It’s kind of turned into a post-apocalyptic Western, mostly because I can’t write about southern Utah without the landscape taking over. This video should give you an idea why:
At the same time, the character’s voice really seems to be taking shape in a way that I like. He’s kind of drifting right now, but the way he writes about it is very much like an old man reminiscing on the course of his life, lingering on the regrets as well as the triumphs, with some rather wistful commentary on each. This is really a character that I can just pick up and run with–the story is practically writing itself.
It’s not just the voice, either. Random stuff is just finding it in–powerful stuff that makes the story awesome. For example, just in the last chapter, the characters were holding a meeting to see what they should do to rescue some of their friends who had been kidnapped. Out of nowhere, one of them pulls out a skull from a human baby, with beads and feathers dangling from it like some sort of totem. He brought it out to show that the people who’d attacked them were not just normal bandits, but cannibals from the Nevadan wastelands, which put them in a whole new category of badassery. Stuff like that comes out of nowhere every time I write, and it’s awesome.
I’ve had a lot of time to write, though I don’t feel I’ve been using it all productively. Still, I’m on track to finish this thing by the end of the month, which will be extremely gratifying.
In the meantime, I’ve been experimenting a lot with cooking and gardening. Just planted some tomatoes in 3-gallon ice cream buckets (with dirt instead of ice cream, of course), and those are growing nicely. It’s fun to have something to water in the morning, and when they start to yield fruit, I’m sure it will be awesome as well.
But I’ve also been experimenting with the old Egyptian kushari recipe I picked up after the 2008 study abroad. It always seemed to be missing that one thing that would make the other ingredients come together and achieve that delicious synergy. Well, I think I’ve found it: chickpeas and cumin, with maybe a touch of vinegar. It might not be 100% authentic, but when I cooked it this time with that stuff, it tasted heavenly.
So this weekend, I’m going to try to perfect the recipe, something I’ve been wanting to do for years. I’ll try cooking the rice in chicken broth, and adding more onions and garlic with maybe a little tomato. Also, coriander–I know that coriander and cilantro are basically the same plant, but I think the coriander will go with this better than cilantro. Also, it helps to fry it with a little oil after taking it out of the refrigerator, rather than sticking it in the microwave. I haven’t had a microwave for over a year, and I think I actually prefer cooking without it.
Speaking of food, my roommate’s sister’s roommates dropped off a bag full of crap from their kitchen, since they’re moving out for the summer. We’ve been having an interesting time combing through it–found some pretty good stuff, actually. One of the more useful things is a bag full of buckwheat, which is AWESOME because kasha was one of my favorite dishes in Georgia. Kasha and lobio–delicious!
So yeah, I’ve had food on my mind a lot this week. If things work out, maybe I’ll post a recipe or two. Kushari is delicious, cheap, filling, and healthy–a winning combination if ever there was one. Kasha is pretty simple, but that’s what makes it so great–a simple, hearty food that leaves you feeling warm and whole.
Besides cooking exotic foods, I’ve also been reading a lot of Freefall. I discovered it just last week, and I have to say, it is awesome. One of the better webcomics I think I’ve ever read. Like Schlock Mercenary, it’s a space opera comedy romp, but where Schlock kind of turned dark in recent years (which I’m not complaining about, don’t get me wrong), Freefall has still stuck to its happy-go-lucky roots. And just like Schlock Mercenary, the humor is not only entertaining, but often wonderfully insightful.
But by far, the best part of the story is how compelling the characters are. My favorite is Florence Ambrose, an artificially bred Bowman’s Wolf who is kind of a human-wolf hybrid. She’s one of only 14 members of her species, and the corporation that created her considers her more as property than an individual. She’s got all these biologically programmed safeguards that force her to obey direct human orders, no matter how ludicrous–but the only way for her species to survive is to convince the corporation that Bowman Wolves are profitable, so that they’ll make more (the whole 50-500 rule and all that).
Somehow, she becomes the engineer of the Savage Chicken, a down-and-out starship captained by the infamous Sam Starfall. Sam is basically a lazy, larcenous alien squid who wants nothing more than to steal everyone’s wallet and become famous doing it. At first, it seems like a horrible combination–Florence is basically a good, honest person, who wants to do good work and please everyone. But as the story goes on, the two develop quite a rapport, and start to rub off on each other.
Florence helps Sam to clean up and get his act together, and Sam helps Florence to learn ways to get around her difficult situation vis-a-vis her safeguards and lack of free will. More importantly, Sam helps her to stop feeling guilty long enough to recognize that doing the right thing sometimes means breaking (or at least twisting) the law.
As if that weren’t enough, there’s the whole cross-species romance angle between Florence and the biologist who rescues her back in one of the earlier subplots. As you might expect, it gets really lonely being the only Bowman’s Wolf on the planet–especially when the other 13 are frozen in cryo, on their way to a world several light-years away. Florence knows that she needs to do what she can to propagate the species, but she’s also got some emotional needs that demand to be satisfied now. Winston is kind of similar, a lonely parasitic biologist on a frontier terraforming project with only 40,000 humans and a 40-60 male-female ratio. Except for the whole cross-species issue, they make a really good couple. I’m riveted to find out what happens next!
So yeah, if I had to sum it up: good, honest, likeable person + insecure future + social limbo + unsatisfied emotional needs = really compelling story. Plus, she’s half wolf–how cool is that? What I would give for her incredible sense of smell…
In any case, it’s getting late, and even though tomorrow is Saturday, there’s a bunch of stuff I want to do tomorrow so I’d better cut this short for now. See you later!
It’s Christmas, but for whatever reason (most likely because you’re Jewish), you don’t celebrate. Or maybe you do celebrate Christmas, but you live in a place where no one else does.
So December 25th comes around and you feel left out. What do you do? Simple–you find a cheap Chinese place, or somewhere similarly non-festive that’s open, and you eat out there. As the tvtropes page adds, bonus points if you bond with the owner despite the language barrier.
This trope is more of a one-liner than anything else, but it pops up here and there. Jon Stewart used it a couple of times on his show, and Brandon Harris Walker wrote his break-out song about it. Also, at Elena Kagan’s congressional hearing for the U.S. Supreme Court, she referenced this trope:
Sen. Lindsey Graham (R-SC): Christmas Day bomber. Where were you at on Christmas Day?
Supreme Court nominee Elena Kagan: Senator… I assume the question you mean is whether a person who’s apprehended in the United States—
Graham:(interrupting) Nah, I’m just asking where you were at on Christmas.
Kagan: (laughs) You know, like all Jews, I was probably at a Chinese restaurant.
(Laughter from crowd)
Graham: Great answer!
Sen. Patrick Leahy (D-VT): I could just see that one coming…
So yeah, there’s actually a fair degree of truth to this trope, as I’m finding out this year. Due to some poor planning on my part, I’m spending Christmas in Georgia, a full 14 days before the Georgian Orthodox Church celebrates it. Yeah, December 25th in Tbilisi is pretty much the same as the 24th, or the 26th.
But it’s actually not so bad. I didn’t eat Chinese last night, but I did go to a local Georgian place with two Frenchmen, an Iranian, a guy from Singapore, a guy from Japan, a Georgian-American, and a global nomad who doesn’t know where he’s from anymore. Today, I went to the Dry Bridge bazaar and bought myself an ornate mosaic chess board. I’ll probaby fix some spaghetti tonight and Skype with my family before going to bed.
So yeah, to those of you celebrating Christmas in the western hemisphere right now, merry Christmas! And to everyone else, I hope you have a great day too!
Sorry for missing the last Trope Tuesday post. We’re in the tail end of the grape harvest here in Georgia, so I’ve been spending a lot of time helping out with that. The next trope post is going to be a big one, so rather than trying to pound it out in the village (where most internet sessions are cut short by a power outage), I figured I’d just wait until next week.
In any case, here are some pictures from the harvest that you might find interesting. Georgia is pretty famous for its wine and grapes–there are over 500 different varieties in the country, many of them indigenous to the Caucasus region. Almost everyone in the village has their own vineyard, so most of the stuff you buy in the market is locally grown and locally produced. Let me tell you, there are few things more awesome than being able to get freshly picked fruit right in your own backyard.
Picking grapes. A bunch of the neighbors came out and helped, in exchange for a basketful of grapes and a nice dinner.Grapes, fresh on the vine.It takes a little more infrastructure to grow them this way, but the end result is much better.The best part of picking grapes is being able to snack while you pick them. 🙂
In terms of writing, I’m making fairly decent progress on my next novel. It’s a fantasy story, so it’s a pretty big shift from all the space opera stuff I’ve done over the last few years. At least, that’s what it feels like. I’m trying not to worry about how much it sucks right now, but if it’s anything like all my other books, it will turn out a lot better than I think it will.
That’s about all for now. I’ll leave you with this hilarious youtube clip of a bunch of Koreans going ape over a Georgian dance troop. The Georgians are awesome, but it’s worth watching for the Koreans’ reactions alone. Seriously, best thing I’ve seen in a long time.
So I got back to the States last night, after about forty six hours of travel (and only four or five hours of sleep). It’s good to be back, but I’m already missing Georgia and thinking about all the things I’ll do once I get back.
The weirdest thing about being back home so far is how non-stressful traveling is. I got to JFK, turned on my American cell phone and found out that the sim card is no longer recognized. My train ticket needed to be rescheduled, I didn’t know who was picking me up back home or when, didn’t know the New York subway system all that well…and yet instead of freaking out, I just shrugged and figured I’d solve all that later. Sure enough, Penn Station had wifi, so I instant messaged my brother in law and had him call my mom and work it out.
The lack of beggars in New York City was kind of strange. There was one kid on the Subway who announced (after apologizing for taking people’s time) that he was trying to make money by selling M&Ms, so I helped him out and bought one. In Tbilisi, some ten year old gypsy kid would fall on her knees and give a huge sob story, then walk through the car with her tin can (and would get more money from it than this kid did in New York).
So that was the first thing I ate when I got here. The second thing was a Jamba Juice. Next was a slice of American pizza–so much better than the stuff in Georgia–and then a bottle of root beer. Man, the soda over here is so disgustingly sweet! I was wide awake until the sugar hit my system, and then it was like taking a sledgehammer to the face.
I’m doing pretty well now, even though I woke up at about 3:30 and didn’t really go back to sleep. There’s not much happening this week, so I should be able to get over the jetlag fairly easily.
As far as Star Wanderers goes, I finished everything but the last scene and the epilogue, so I’ll wrap those up today and get ready to publish Part I. The last few chapters aren’t as awesome as I’d like them to be, but I should be able to work those out in subsequent drafts.
In other news, I recently did an interview on Scifinerdsare.us. It’s more geared towards writers than readers, but worth checking out. There seems to be a lot of polarization these days between writers who self publish and writers who follow the more traditional path, which is unfortunate. That said, indie publishing is definitely the best thing career-wise that’s happened to me.
Finally, I just watched a fascinating lecture by Douglas Rushkoff on the Occupy movement and a new cultural phase that he terms “presentism.” The most interesting thing for me is what he has to say about the way our democracy is evolving–basically, it’s becoming a little more like The Colony from Bringing Stella Home. So many story ideas to play with…

 At first, I bought my oats in tins like this. The price was reasonable, and it lasted much longer than a box of cereal. But then I started shopping at a whole food store, and I realized that oats were much cheaper if you buy them by the pound. Some stuff you don’t want to buy that way, but oats are oats, so it really doesn’t make much of a difference where you buy them. So I switched.
 A fifty pound bag of anything is prone to give you sticker shock, but when I calculated the price per pound, I realized that the value was almost twice as good as the stuff I was buying at the whole food store. And since I had completely switched to oatmeal by this point, I knew that I would eat it.